Just Inherited ExpenseIn? Your Guide to Getting Started
By Ashley FerroOctober 11, 2023
Share:
Stepping into a new role or system can be like navigating unfamiliar terrain. You've just inherited ExpenseIn, and suddenly you're swamped with questions:
How do you efficiently log expenses?
What's the best way to streamline approvals?
How can you ensure everyone is adhering to company policies?
We understand the challenges and uncertainties that come with adopting a new platform. This guide is designed to address those very problems, offering clarity and confidence as you embark on your ExpenseIn journey.
Dive in, and let's turn those questions into capabilities:
ExpenseIn is all about simplifying the expense management process. Whether it's a casual team lunch or a significant business event, the platform ensures every cost is meticulously recorded, reviewed, and approved. Its user-friendly design means you won't spend hours trying to figure things out.
But ExpenseIn isn't just about receipts and approvals.
If your team members are often on the move, they'll benefit immensely from the mileage tracking feature. Synchronised with Google Maps, this feature ensures every mile covered is accurately accounted for. This accuracy is crucial not just for straightforward reimbursements but also for adhering to HMRC guidelines.
Additionally, ExpenseIn simplifies the process of reimbursing ad hoc expenses. Whether it's for volunteers, research participants, or other non-employees, this feature removes the usual complications.
And for those supplier invoices? The platform offers a feature to capture and approve them efficiently.
As you delve deeper into ExpenseIn, you'll uncover a range of features designed to streamline and enhance your organisation's financial processes. It's more than just a tool; it's a solution that can transform your expense management approach.
So, let’s jump into how exactly to get started using ExpenseIn as a new admin.
How Do I Get Started with ExpenseIn as the New Admin?
Embarking on your ExpenseIn journey requires a solid foundation.
That’s why in this section, we'll walk you through the initial steps of navigating and optimising the platform for your organisation's needs.
Getting Started with ExpenseIn
Upon logging in for the first time, we recommend you check your organisational details as they form the backbone of your ExpenseIn experience.
It's essential to ensure these details are accurate. Simply navigate to 'Account Details' to review and make any necessary updates.
As your organisation grows or undergoes changes, you can easily add new users via the Admin section. Remember to have your Departments, Policies, Approval Flows, and User Groups set up before adding new users.
Also, make sure notifications are set up for important actions, like when an expense is ready to be approved.
Pro-Tip: Enhance security by enabling Two-Step Authentication for the user, requiring a verification code each time they sign in.
Structuring Your ExpenseIn
Departments are a great way to group users, making expense management and reporting more streamlined.
Depending on your current setup, you might want to revisit the approval flow to ensure each expense undergoes the right vetting process.
ExpenseIn also allows you to organise and classify different types of expenses, aiding in detailed financial tracking through Expense Categories and Projects.
Pro-Tip: Regularly review your ExpenseIn structure. As your company grows, updating departments and approval flows ensures consistent and efficient financial tracking.
Customisation & Advanced Settings
Custom fields in ExpenseIn allow you to capture specific data tailored to your company's unique needs. Whether it's for the admin area or for end-users, these fields can be customised to fit your requirements.
For instance, if you're in a project-based industry, you can customise fields to log expenses under specific project titles, ensuring accurate billing and tracking.
Dive into the Advanced Settings to fine-tune your ExpenseIn experience. Here, you can explore various tabs and customise settings specific to each area.
Pro-Tip: When customising fields, consider the most frequent queries or issues your team encounters. Remember, the goal is to make the system intuitive for both admins and end-users.
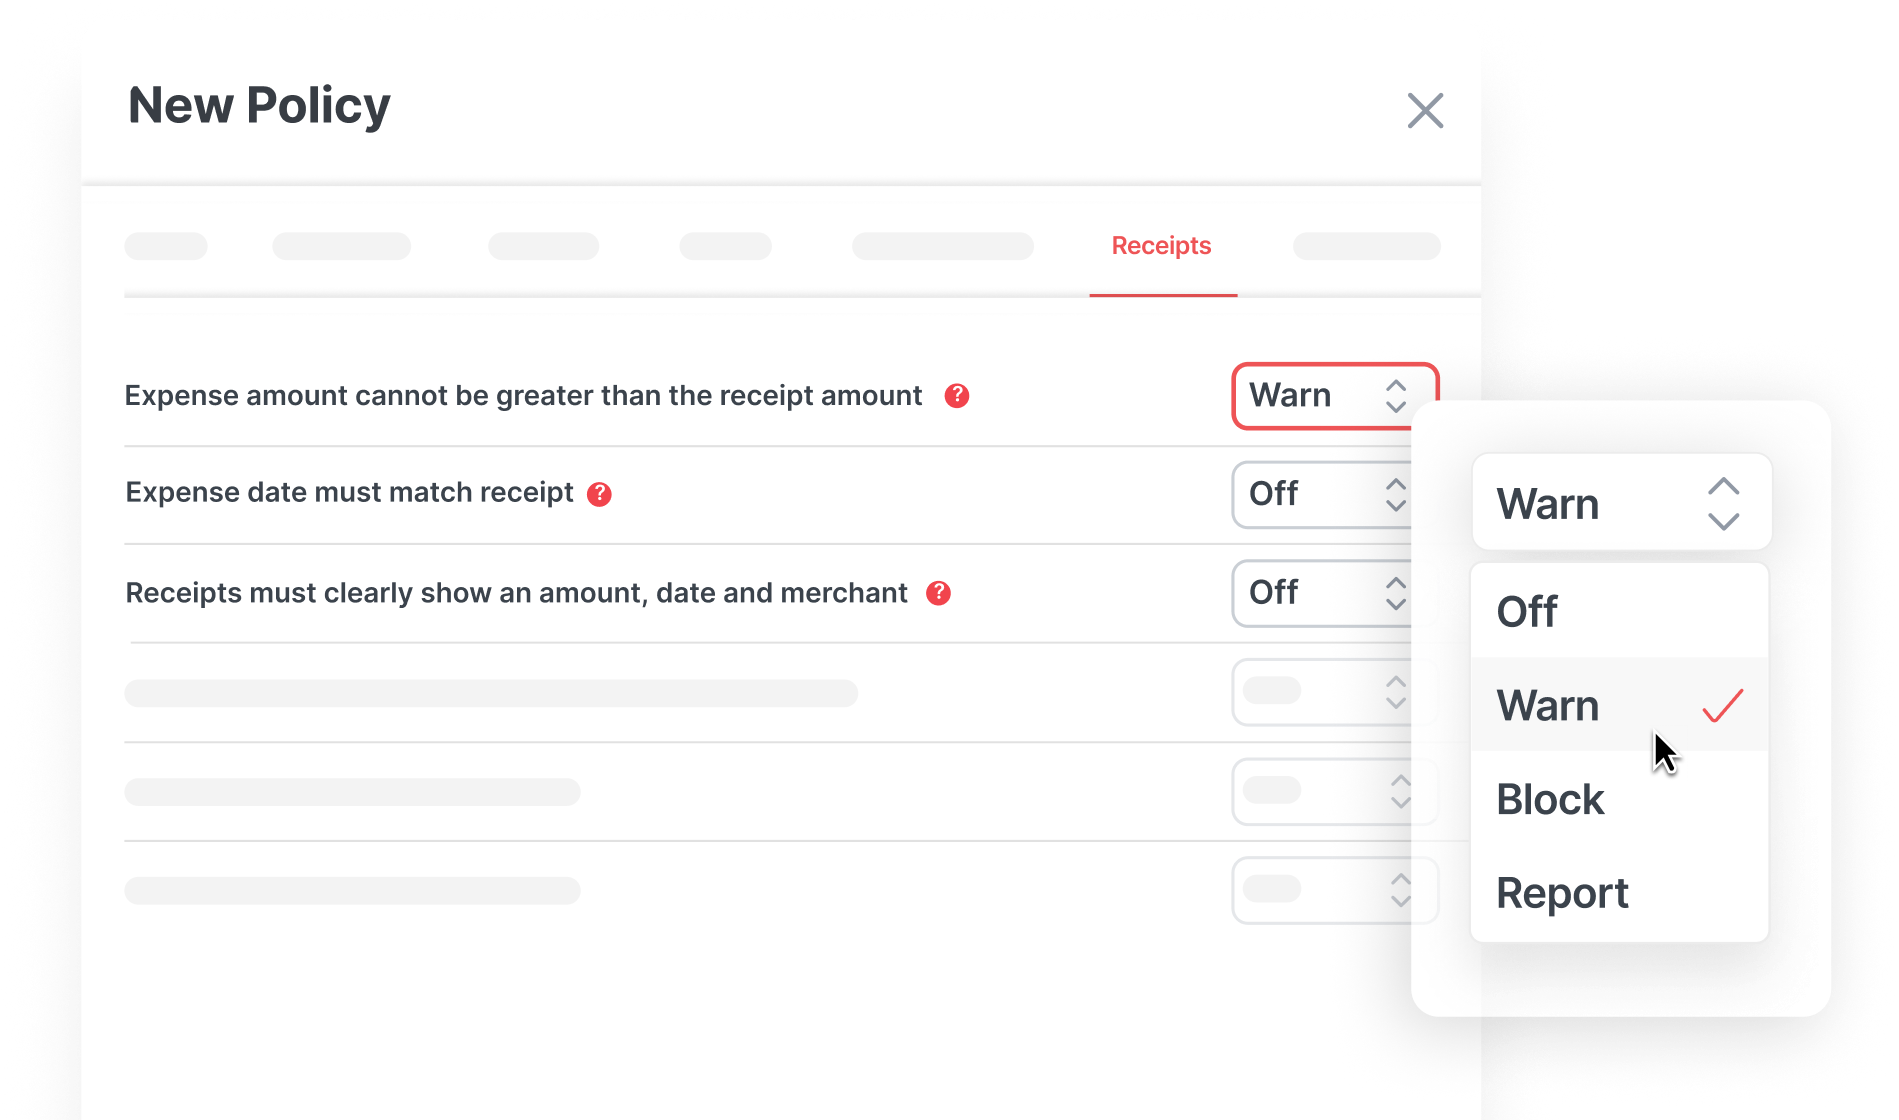
Policies & Compliance
Expense policies are your safeguard. They ensure all expenses align with your company's guidelines.
By setting up these rules, you can automate checks and balances, making the expense approval process smoother and more compliant.
Pro-Tip: Regularly review your expense policies in tandem with any changes in company guidelines or industry regulations. This ensures that your policies remain up-to-date and continue to serve as an effective safeguard against non-compliant expenses or invoices.
What Should I Know to Fully Leverage ExpenseIn's Features?
Guiding Users on Efficient Expense Submissions
As an admin, it's essential to ensure that your team is well-equipped to use ExpenseIn efficiently. This not only streamlines the expense approval process but also reduces errors and discrepancies.
Download mobile app: Encourage your team to download the ExpenseIn mobile app. It's an invaluable tool for capturing expenses or approving expenses on the move.
Receipt capture: Emphasise the importance of capturing clear images of receipts. Highlight the convenience of using the ExpenseIn app or emailing receipts to receipts@expensein.com.
Draft expenses: Teach them how to attach receipts to draft expenses. If they encounter situations with multiple receipts for a single expense or need to attach one receipt to multiple expenses, guide them on how ExpenseIn can handle these scenarios.
Expense details: Ensure they understand the importance of filling in all necessary details, selecting the right categories, and entering accurate amounts.
2. Highlight Common Mistakes & Solutions
Editing expenses: Remind them to double-check entries before submission. If they spot errors in a draft expense, guide them on how to edit it.
Duplicate submissions: Educate them about the system's capability to flag duplicate expenses and the importance of being vigilant to avoid double submissions.
3. Share Tips for Faster Approvals
Clear images: Stress the importance of clear and legible receipt images.
Complete details: Encourage them to fill in all required fields and provide brief descriptions when necessary.
Stay organised: Advocate for regular expense submissions to avoid backlogs.
Company policies: Remind them to familiarise themselves with the company's expense policies for smoother approvals.
Deep Dive into Analytics & Reporting
Reporting Dashboard
Exclusively accessible to Finance admins, the Reporting Dashboard is the epicentre of ExpenseIn's analytical capabilities, boasting real-time reporting features.
The dashboard provides a comprehensive view, enabling Finance admins to access and utilise real-time expense reports. This ensures that any strategic decision is based on the most recent data and trends.
Key features include:
Understanding expenditure: Generate reports filtered by user, department, expense type, category, and more. This granularity allows you to pinpoint which department or individual incurs the most expenses.
Integration with accounting systems: ExpenseIn supports accounting & analysis codes, ensuring seamless integration with your existing financial software. Plus, you can customise export formats to suit your needs.
Scheduled Reports
Stay updated without the constant need to log in.
ExpenseIn offers Finance admins the ability to create an export schedule for automatic expense report generation. These scheduled reports can be sent directly to your inbox or even to your SFTP server.
By automating this process, you free up time for other pressing tasks and only need to check when the report lands in your inbox.
Integration Mastery
Maximising the capabilities of ExpenseIn goes beyond its inbuilt features.
By seamlessly integrating it with other tools and platforms, you can create a cohesive ecosystem tailored to your organisation's unique needs.
Existing Integrations
Review and optimise: Begin by reviewing any current integrations you have with ExpenseIn. Ensure that they are functioning optimally and meeting your organisation's needs.
Accounting software: ExpenseIn offers seamless integration with various accounting software solutions such as Sage, NetSuite, Quickbooks, Xero and AccountsIQ. This ensures that expense claims can be directly imported, streamlining the financial reconciliation process. Learn more about accounting software integrations.
Business management and productivity solutions: Connect ExpenseIn with business management tools like Business Central and productivity solutions such as Power Automate to enhance operational efficiency.
Automated payment solutions: With Telleroo integration, ExpenseIn offers a streamlined payment process, allowing for quick and efficient expense reimbursements. Telleroo's automated payment solutions ensure that payments are processed swiftly, reducing the waiting time for claimants.
Identity management: Secure your ExpenseIn platform by integrating with identity management solutions. This not only enhances security but also simplifies the login process for users.
Potential Integrations
ExpenseIn is continuously evolving, and new integrations are added regularly.
If your preferred software isn't currently on their list, it's worth reaching out to the ExpenseIn team to inquire about upcoming developments or speak with our experts about our API solutions.
User Training & Engagement
Ensuring that your team is well-versed with ExpenseIn is crucial for maximising its benefits.
Regular training sessions and open communication channels can significantly enhance user experience and the overall efficiency of the platform.
Here's how you can achieve this:
Refresher Sessions
Why they matter: Over time, users might forget some features or not be aware of new updates. Regular training helps keep everyone on track.
Customised training: Offer sessions based on roles or departments. This way, users get information most relevant to them.
Hands-on learning: Use interactive sessions where users can ask questions and share their experiences. It's more engaging and practical.
Feedback Loop
Easy ways to share: Set up simple methods for users to give feedback, like quick surveys or a feedback email.
Use the feedback: Regularly check the feedback and see where you can make improvements.
Say thanks: Acknowledge those who give feedback. A simple thank-you can encourage more people to share their thoughts.
What Support & Resources Are Available for ExpenseIn Users?
Inheriting a new system like ExpenseIn can feel overwhelming, especially when you're trying to understand its many features.
But don't worry, the ExpenseIn Help Centre is your first port of call. It's packed with step-by-step guides, tutorials, and FAQs to help you get acquainted.
If you ever need more personalised assistance, the ExpenseIn support team is readily available. You can reach out to them via email at info@expensein.com or by phone at +44 (0)333 414 1808.
As you continue with ExpenseIn, staying informed with the latest updates will ensure you get the most out of the platform. We're here to support you every step of the way.
Learn how finance system integration connects expenses, approvals, and accounting data, so finance teams can reduce manual work, improve control, and close faster.